
News
Duxy’s Underwater Photography Blog: Available Light, Part 2
Why so blue?
In part one of our series on Available Light, I looked at why wide angle lenses are such a deal breaker when trying to get great available light in underwater pictures.
Wide angle lenses are only part of the solution though, and a two pronged assault on the flat, blue problem pictures is what is needed.
We’ve established how you need to get much closer to your subject hence the wide angle lens, but we also need to address the lack of colour that will blight a lot of underwater shots.
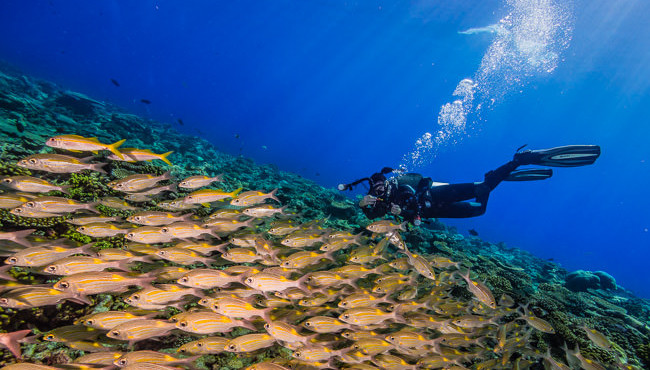
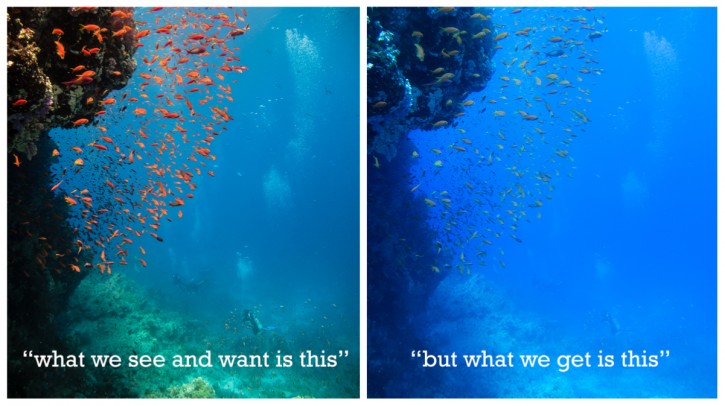
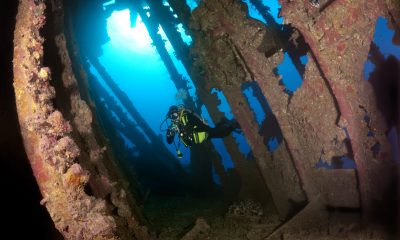
We see a multicoloured vibrant reef, resplendent with hard and soft corals, populated by a variety of fish in a myriad of hues. Yet why do our pictures end up as just fifty shades of blue?
Our perception of what we are seeing is one of the main issues in available light underwater photography. So using Custom White Balance allows us to take back control of the situation.
What’s going on?
It helps if we understand a little of what is happening. As we descend the colours are filtered out progressively more as we leave the surface, with the reds and oranges disappearing first followed by the yellows then greens as we approach the relatively modest depths of 15 to 20 metres.
In our minds eyes though, especially nearer to the surface, we “experience” these colours because our brains are tricking us a little. Our cameras though see things as they really are, which is why folk are often disappointed with their first foray into underwater photography.
Pre-digital cameras, we had little alternative than to use strobes or flashguns to replace the colours in our shots.
With the advent of digital though came a new option to control the colour temperature in our pictures, and for each and every shot if we wished.
This opened the door to a whole load of exciting new possibilities for us underwater photographers, and this was called Custom or Manual White Balance.
Setting the right balance
Most digital cameras these days have an option to control the colours of their end results. This is accessed using the menu controls, and is normally a bunch of symbols under the heading of white balance. It’s very difficult to be specific here, as each brand, and even individual models of camera, are often different in this respect. If you’re not sure with your camera, or are thinking of buying a suitable camera once again, get in touch at duxy@scubatravel.com and I will advise you on the current choices.
With beginners this is the single most popular thing I start folk off with on our photo workshops.
When you find the White Balance menu on your particular camera you need to find the symbol in the middle. After accessing it your camera will tell you what to do onscreen. I can’t be more specific because it differs widely from camera to camera.
It’s usually the turning point when they realise that they are able to get great colourful underwater pictures. Here’s a selection of white balanced photos and videos that I shot with compact cameras from across the years:
https://www.youtube.com/watch?v=_V9UUQTSDpk
OK, hopefully that’s shown you that this is a valid technique for putting some colours back in your pictures.
How to do this is the big question though.
As I mentioned, most cameras are very specific with their means to correctly White Balance, but generally speaking the procedure requires you to show the camera a reference “white”. This can actually be a neutral mid grey tone too – a slate is one solution.
Or I tend to just use my hand (see below). You don’t need to fill the whole frame with your hand; better still to hold it at around the distance your foreground interest will be.
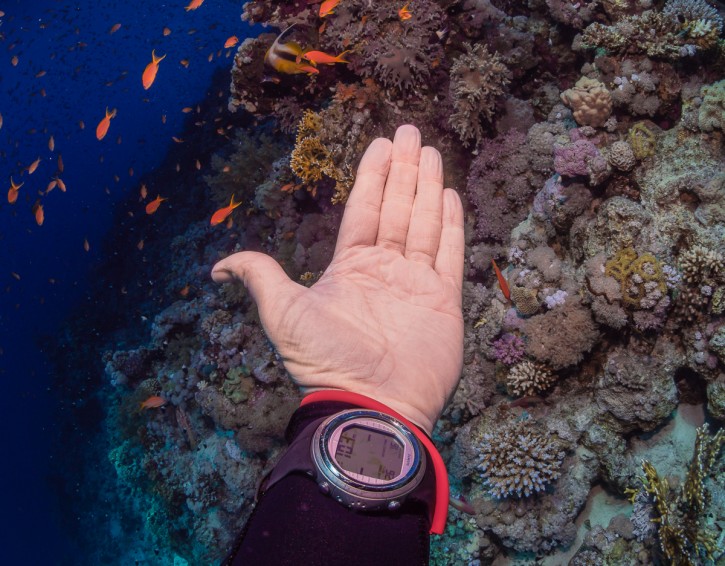
This is the usual distance and size in the frame of my hand when taking a white balance reading. I try and replicate the angle and depth at which I am shooting as accurately as possible too.
Follow and read your instruction book
And then you nearly always follow some onscreen instructions to take the reading.
What is clever here is that the camera will try and bring back the neutral mid grey or white back to what it should be, and hopefully then any colour cast, i.e. the blue of the water, will stop affecting the colours in your shots.
As you go deeper you need to take further readings, as the depth that you are at effects the white balance quite markedly.
Distance from subject is also an issue, so it helps to factor in this when you take the reading.
OK – if you follow this procedure in an ideal world and with the conditions in your favour, you’ll get great colourful pictures. Unfortunately we don’t live in a perfect world, and Custom White Balance doesn’t always provide such a simple solution.
So in the next instalment of this four part series we’ll look at some of the pitfalls to Custom White Balance, and in what circumstances it works best, and more importantly what circumstances it doesn’t work too well with.
[hr style=”single”]
![]() Duxy is the in house photo-pro for UK-based dive tour operator Scuba Travel. To find out about availability on Scuba Travel’s underwater photography workshops hosted by Duxy click here.
Duxy is the in house photo-pro for UK-based dive tour operator Scuba Travel. To find out about availability on Scuba Travel’s underwater photography workshops hosted by Duxy click here.


Fire on Monroe Bravo is the latest book in the Jack Collier series by Fred Lockwood. Our story begins with our lead characters, Jack and Sandro, owners of Marine Salvage & Investigation Company, arriving on the Monroe Bravo Oil & Gas Platform in the North Sea. Having secured a contract for their vessel the MV Stavanger to act as support ship to the platform for TransGlobal Oil, our protagonists are on a celebratory visit.
However almost as soon as they arrive a series of explosions rock the platform, causing huge damage, loss of life and the very real danger of a massive human, ecological and financial disaster.

As the danger mounts for both our heroes and the surviving workers, Jack and Sandro will have to escape the inferno, all while trying to save the platform and the men still trapped unable to help themselves.
The disaster sets the scene for the unfolding story lines following the fate of the platform and our main characters, the police investigation into a suspected terrorist act and the actions of TransGlobal Oil as they attempt to navigate the pubic outcry and financial repercussions.
In his eighth book, Fire on Monroe Bravo, Fred Lockwood delivers an explosive thriller, with plenty of above and in-water drama, and our heroes fighting for survival, what more can you ask for?
We thoroughly recommend this read and look forward to the next in the series. For more information about his book series, you can check out the reviews of his previous books here on Scubaverse.
- Title: Fire On Monroe Bravo
- Author: Fred Lockwood
- ISBN: 979-8325324536
Available in a paperback version and for Kindle from Amazon and book stores.

In June we were incredibly fortunate to be invited to dive in Alonissos, a small Greek Island in the Sporades island chain located in the North Aegean Sea. While I have long been a big fan of the Greek Islands as a great holiday destination, I had not had the opportunity to do any diving on previous visits and Mike and I were extremely excited to see what Alonissos had to offer both above and below the surface!

The Sporades are easily accessible via the airport in Skiathos (the first island in the chain), which is served by Jet2 flights from all major UK airports from May through October. Numerous ferries and charter boats make island hopping from Skiathos Town a breeze. After an hour boat ride, the picturesque port of Patitiri was a wonderful introduction to Alonissos, where we were met by our gracious hosts Kostas of Albedo Travel and Dias of Alonissos Triton Dive Center. Mike and I were delighted to be staying at the Paradise Hotel, aptly named for its stunning views over the sea and great location for walking to the waterfront.

Alonissos is beautifully situated in the National Marine Park of Alonissos and the Northern Sporades, the largest marine protected area in Europe. The surrounding seas offer fabulous marine life, including incredibly rare species such as the Mediterranean monk seal. They boast deep walls covered in gorgonians and sponges, stunning topography with caverns, swimthroughs and pinnacles, and the first accessible ancient shipwreck from 500BC!

In locations where historical sites have been reported, the waters are largely restricted, but with collaboration between government, underwater archeologists and dive centres, incredible underwater museums are being created for a truly unique diving experience. Alonissos is home to the first of these, the Ancient Shipwreck of Peristera Accessible Underwater Archeological Site. The chance to dive into history (along with reports of healthy reef life and amazing underwater topography) meant Mike and I were keen to get in the water.

Our introduction to the diving around Alonissos was at the Agios Georgios Pinnacles, in the channel between Alonissos and Skopelos. This fantastic site was named “The Chimney,’ and proved to have a huge amount to see. We got to a decent depth here (over 25m), and marvelled at a colourful reef wall with a wonderful swim through whose rocky walls were absolutely covered with life. As well as brilliant topography there was no shortage of macro life here. We saw numerous nudibranchs, five different species in total. The second dive at Mourtias reef nearby was a shallower dive along a nice wall with lots of crevices. Several moray eels and grouper called this site home. We enjoyed looking in the crevices for lobster and smaller benthic life, such as cup corals and tunicates.

Our itinerary allowed us two dives a day with afternoons left to explore the island with our hire car and evenings to enjoy the famous Greek hospitality. This proved to be a lovely mix of in-water and land based diversions.

The next days diving to the Gorgonian Gardens and Triton’s Cave was to be even better! These two stunning sites are nothing short of fabulous. The Gorgonian Gardens was a deep wall near to the Agios Georgios islands. The ever-present currents in this deep channel meant that the sea life was amazing … the namesake Gorgonian sea fans dotted the wall at a depth of 30 to 50 meters, getting ever larger the deeper we went. Above 30m was by no means less beautiful, with sponges, corals, scorpionfish, moray eels and some rare and colourful nudibranchs.

The second shallower dive of the day was to Triton’s Cave or the Cavern of Skopelos, on the east side of that island. The spectacular rock formations had wild striations both above and below the water making a truly epic topography. The cavern entrance was at 14m, and big enough for a buddy pair, winding up to 6m and passing two beautiful windows out into the blue. Emerging from the cavern, the light at the shallower depths and the incredible rock formations made for a fantastic gentle swimming safety stop and we all surfaced by the boat with massive grins.

Check out our next blog :Alonissos: The complete diving destination (Part 2)” to hear about our amazing dive on the 2500 year old Peristera Wreck!
Thanks to:
Alonissos Triton Dive Center https://bestdivingingreece.com/
Albedo Travel https://alonissosholidays.com/activities/
Paradise Hotel https://paradise-hotel.gr/
Alonissos Municipality https://alonissos.gr/en/

-

 Blogs2 months ago
Diving With… Nico, Ocean Earth Travels, Indonesia
-

 News1 month ago
Murex Bangka Announce New Oceanfront Cottages & Beachfront Dining
-

 Blogs2 months ago
A new idea in freediving from RAID
-

 Marine Life & Conservation1 month ago
Iceland issue millionaire whale hunter a licence to murder 128 vulnerable fin whales
-

 Marine Life & Conservation2 months ago
The Shark Trust Great Shark Snapshot is back
-
 News3 months ago
Charting New Waters; NovoScuba Goes Global with the Launch of their Revolutionary Dive Training Agency!
-

 Gear News1 month ago
New Suunto Ocean – a dive computer and GPS sports watch in one for adventures below and above the surface
-

 Marine Life & Conservation Blogs2 months ago
Book Review: Plankton